Description
- Brand Name: West Biking
- Certification: NONE
- Origin: CN(Origin)
- Stopwatch and Accessories: Waterproof Stopwatch
- Model Number: YP0702029
- Bicycle Computer is_customized: Yes
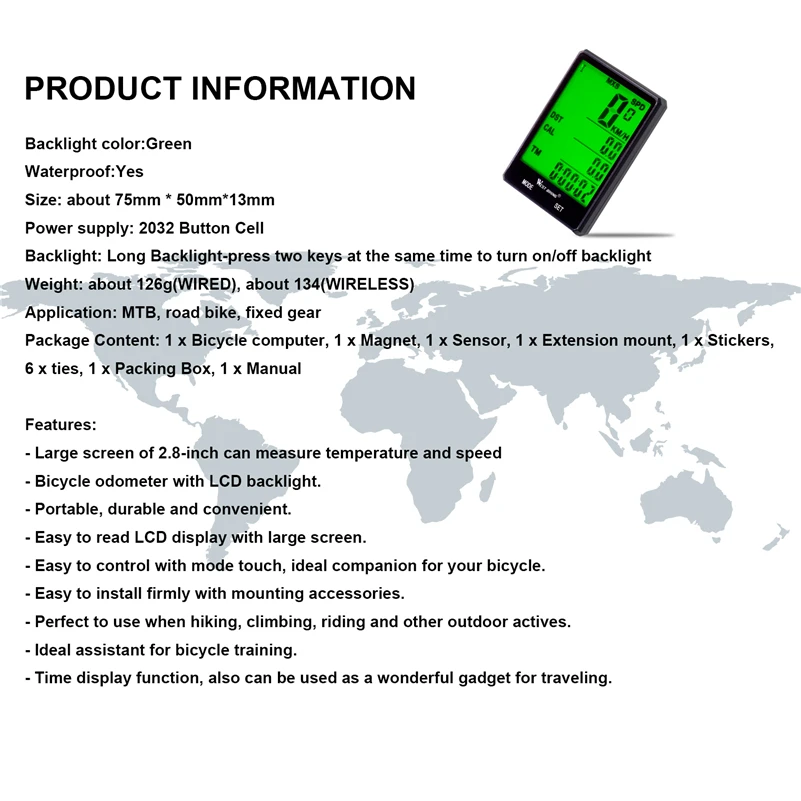
- Bike Computer Function: 20 Function , Please see details
- Cycling Computer Colors: Black
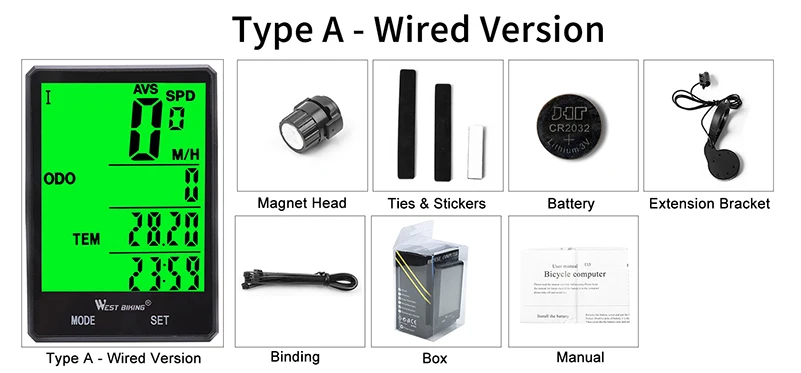
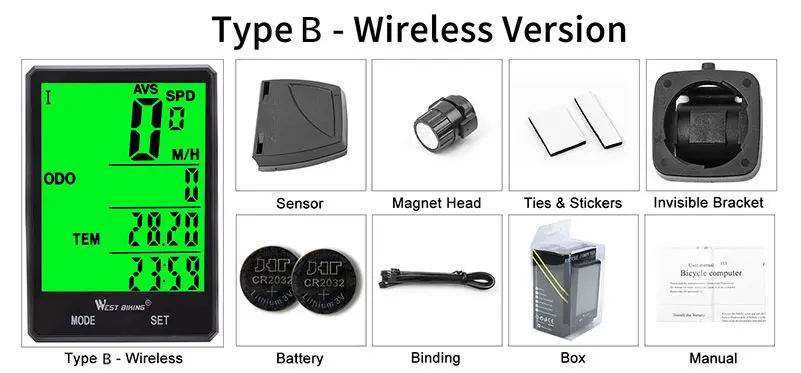
- Bike Computer package kind 1: Wireless Computer
- Bike Computer package kind 2: Wired Computer
- Bicycle Computer Features: Large screen, multi-function, waterproof, strong installation
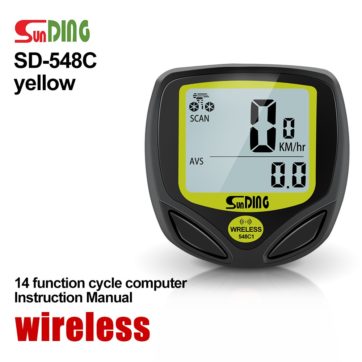
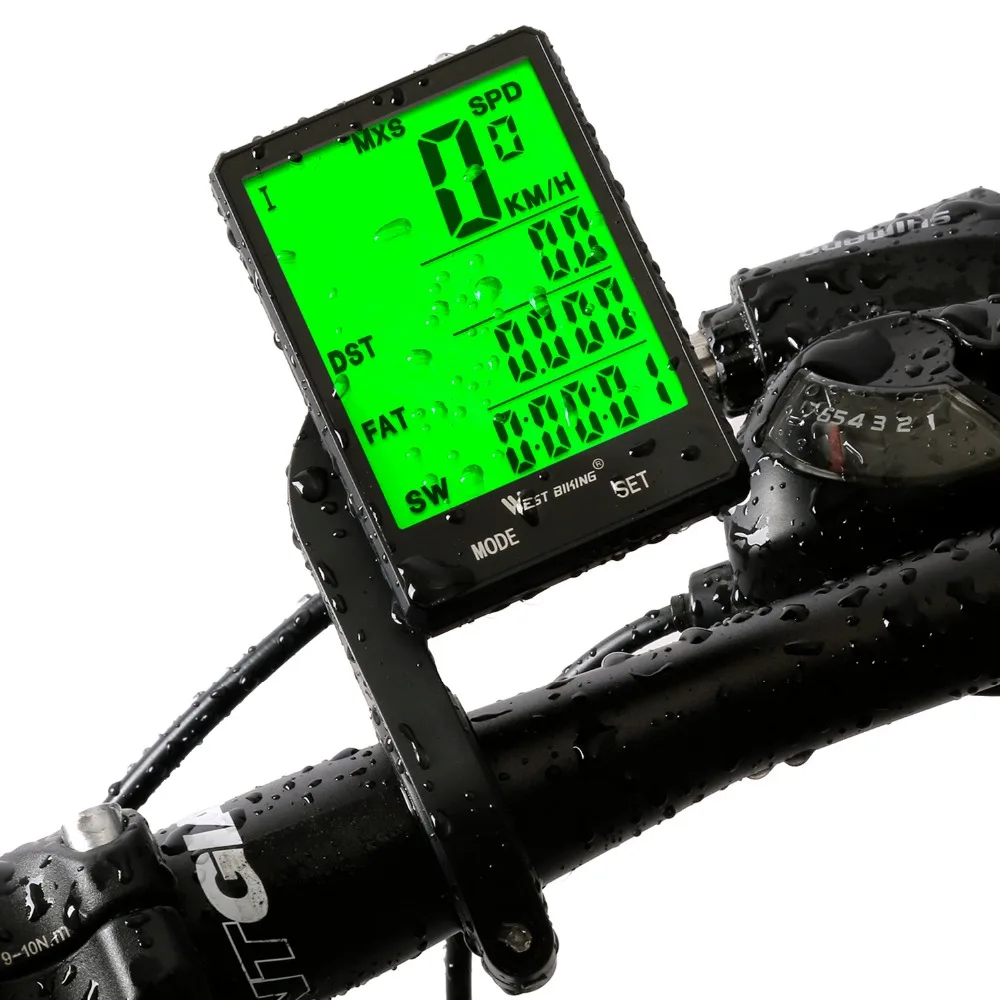
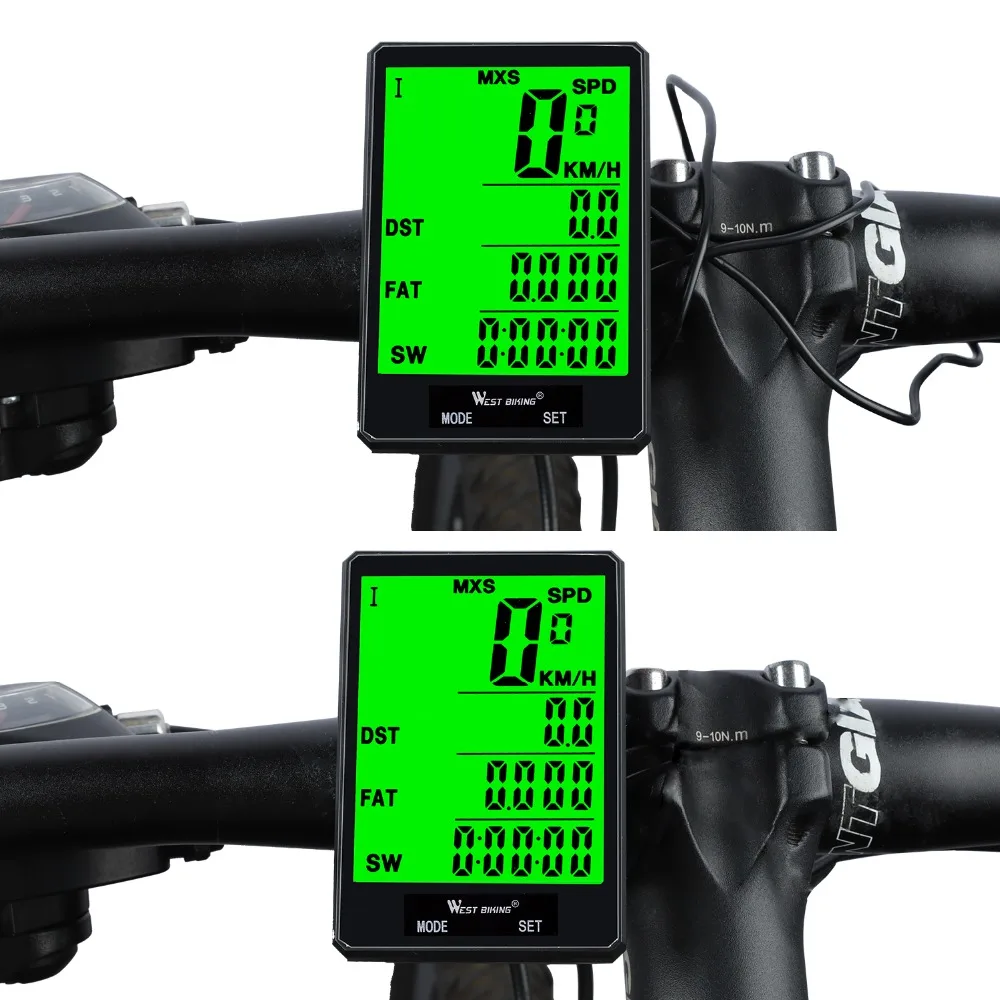
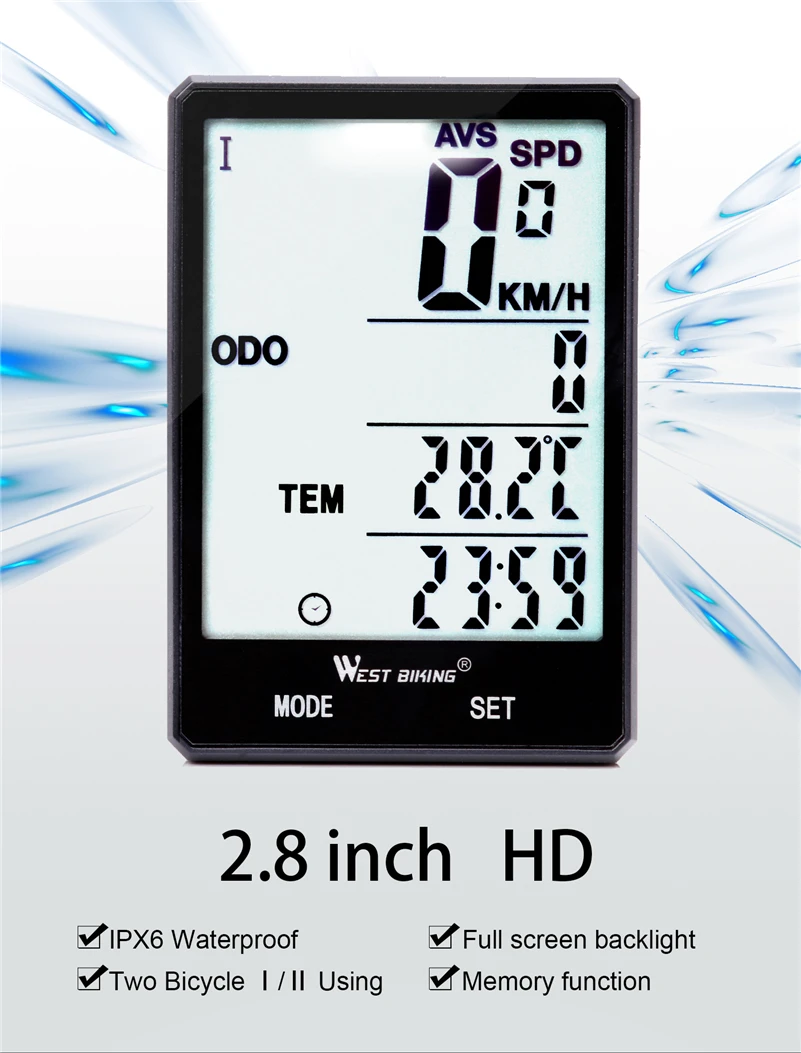
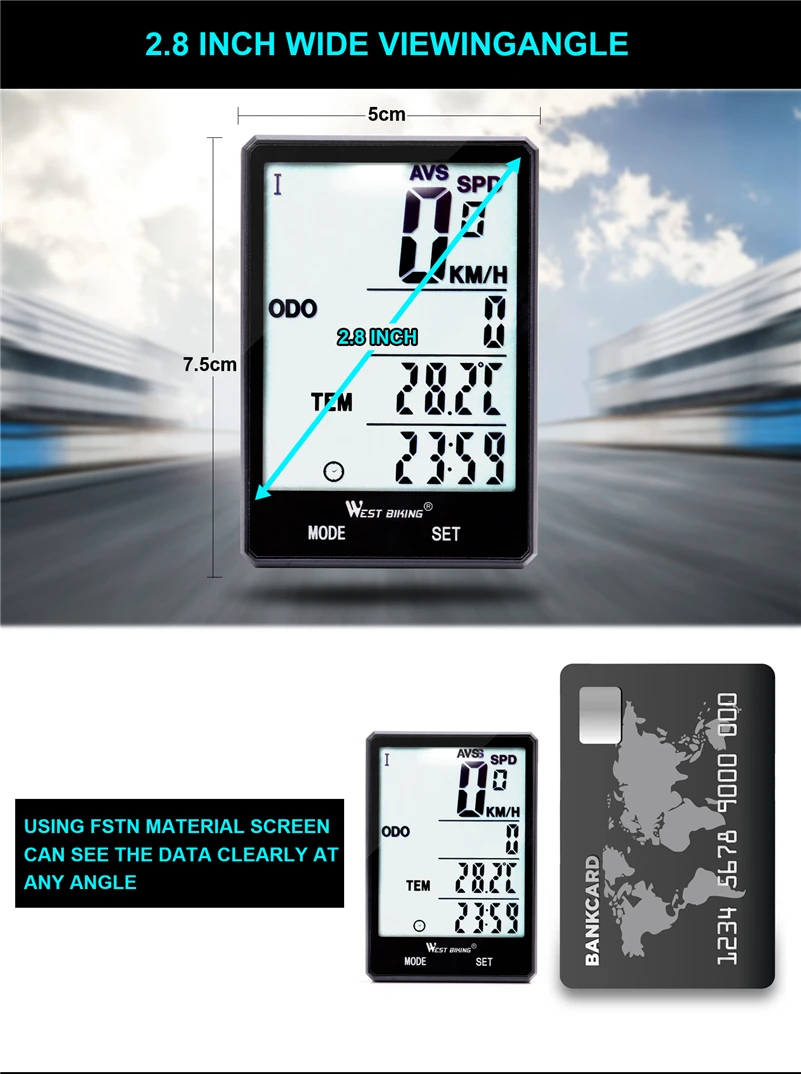
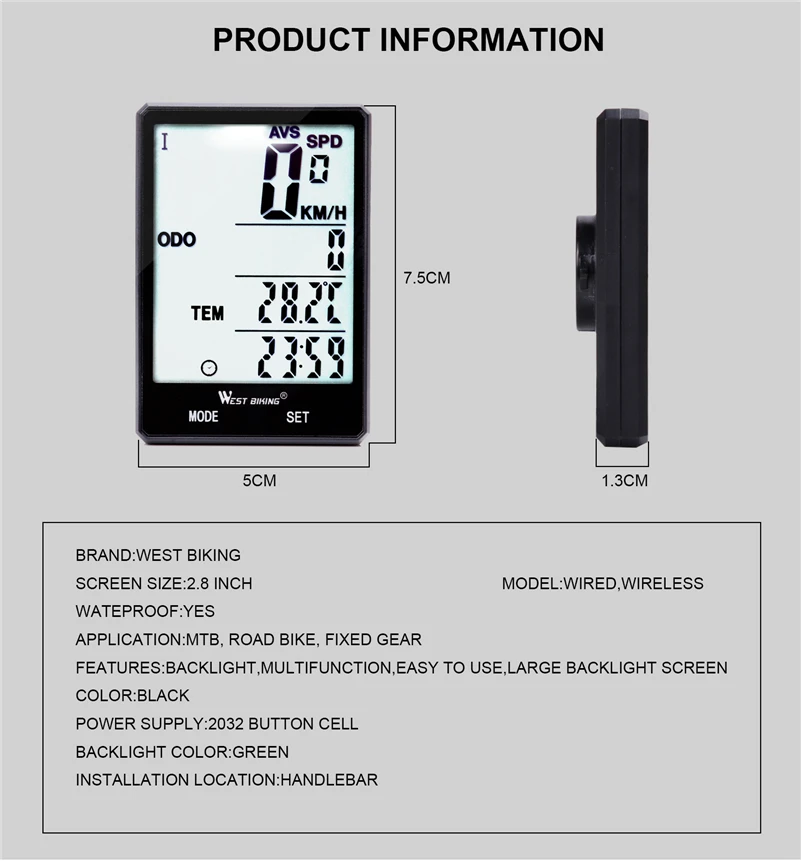
- Cycling Computer: 2.8" Large Screen Bicycle Computer
- 2.8" Large Screen Bike Computer: Rainproof Speedometer
- Odometer Bike Stopwatch: Wireless and wired
- Rainproof Bicycle Speedometer: Bike Speedometer
|
No. |
First-class service to dispel all doubt |
|
1 |
Free resend or refund for quality problem |
|
2 |
Full refund for delivery failed |
|
3 |
Logistics tracking reminder |
|
4 |
Product color has error |
|
5 |
Item video display service |
|
Tips |
If you still have doubts, please feel free contact us. |
WEST BIKING 4 Type Bike Computer 2.8" Speedometer Odometer Rainproof Cycling Bike Measurable Temperature Stopwatch Bicycle Computer
A Type Bike Computer
B Type Bike Computer


Please take out the insulation sheet in the product before using.


Instruction
(Mode-Left key, Set-Right key)
(Please tear the screen protective film first, and read step by step)
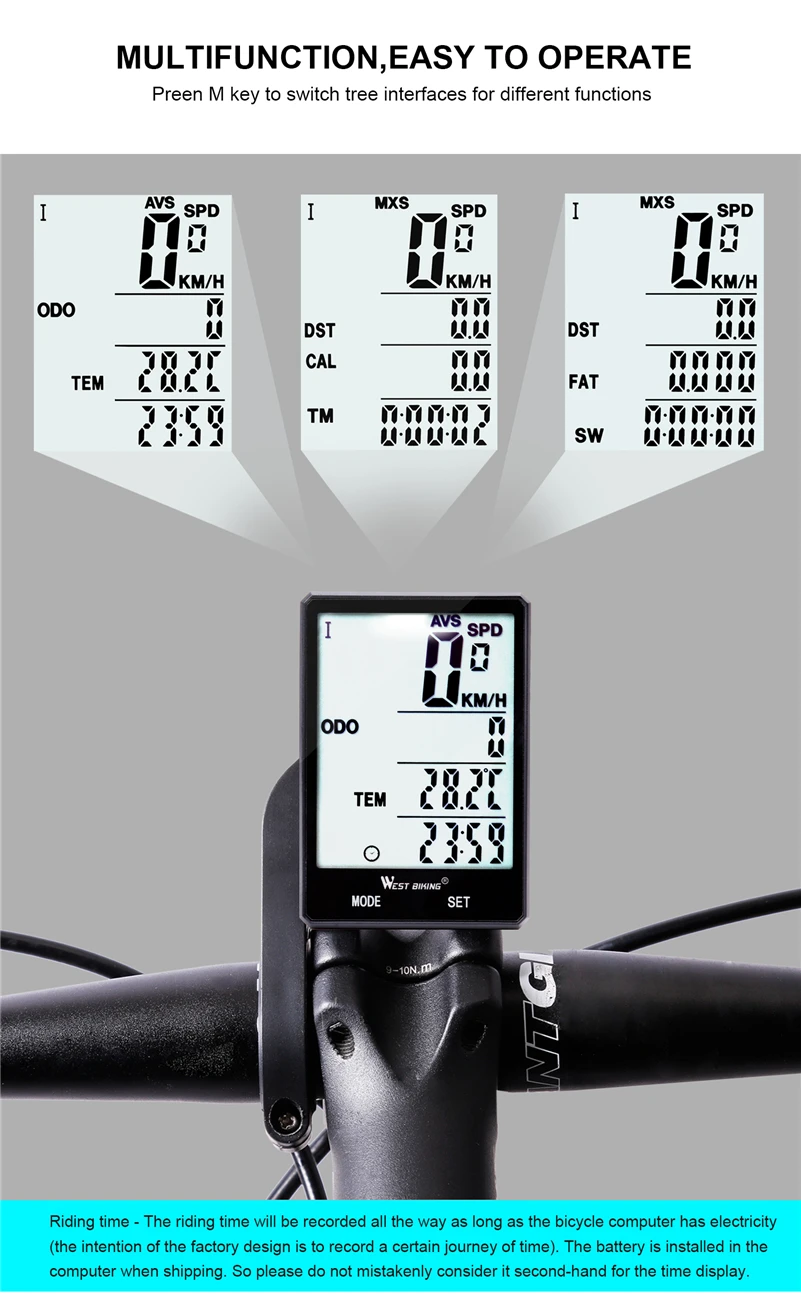
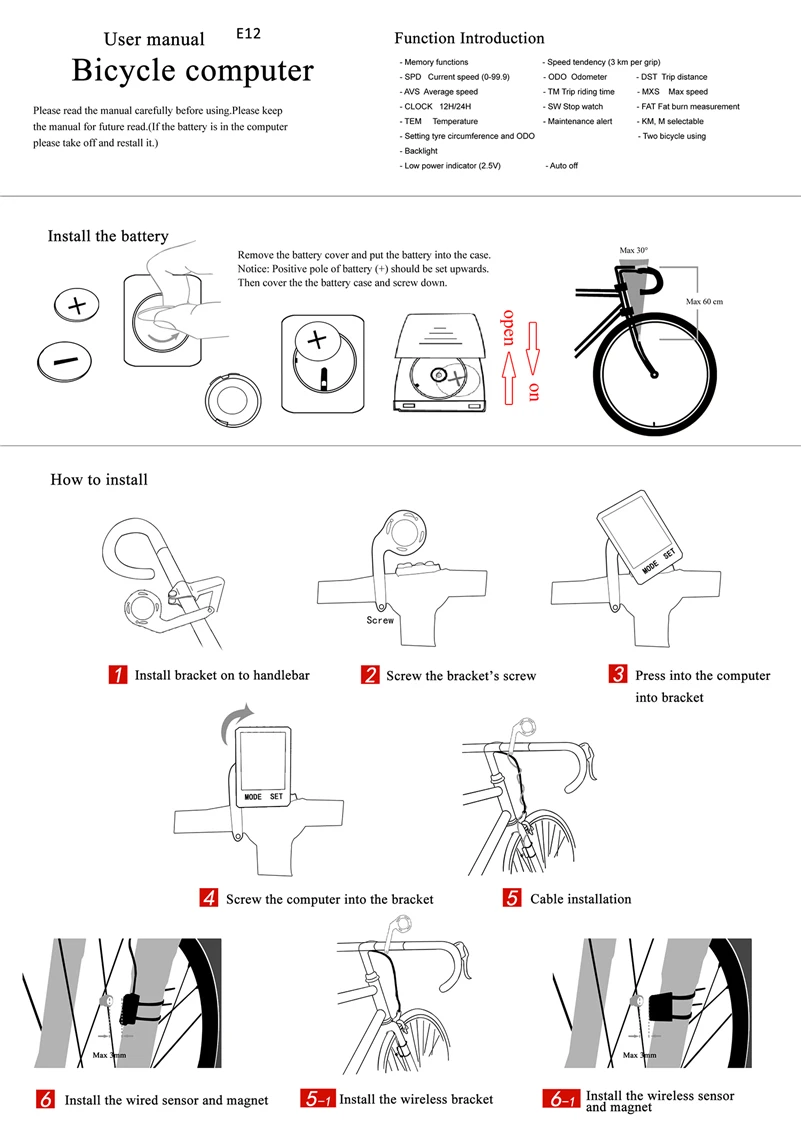
20 Functions
– Memory functions
– Speed tendency (3 km per grip)
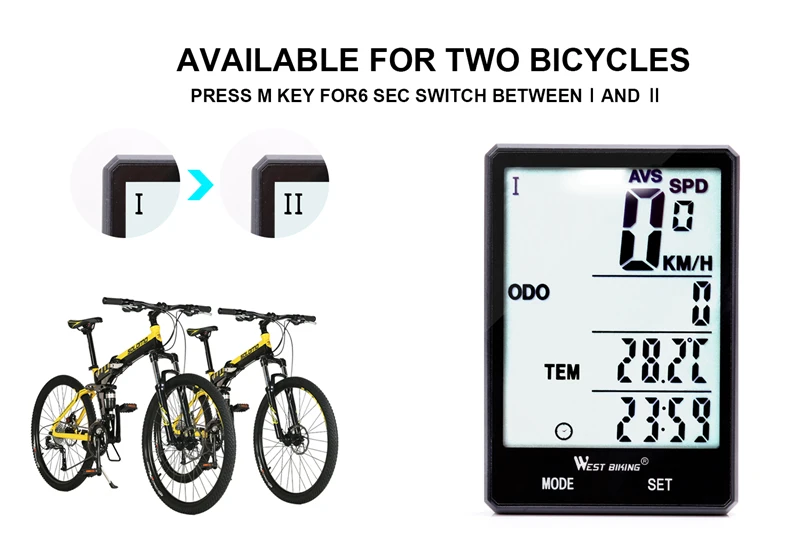
– Two bicycle using
– SPD Current speed (0-99.9)
– ODO Odometer
– DST Trip distance
– MXS Max speed
– AVS Average speed
– TM Trip riding time
– CLOCK 12H/24H
– SW Stop watch
– CAL Calories Level
– FAT Fat burn measurement
– TEM Temperature
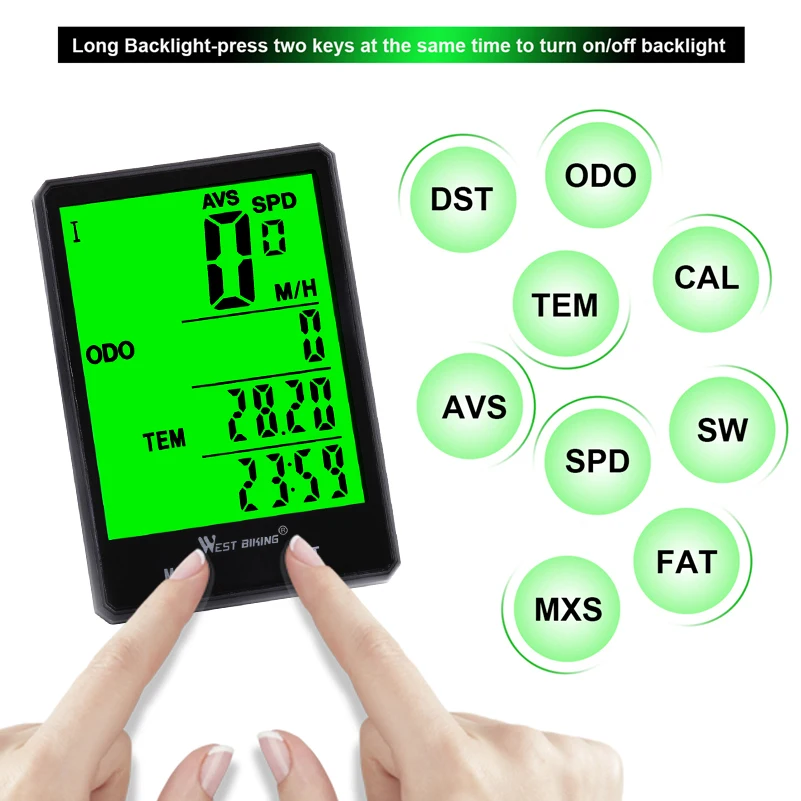
– Backlight
– Low power indicator
– Maintenance alert
– KM, M selectable
– Setting tyre circumference and ODO
– Auto off
Battery Installation
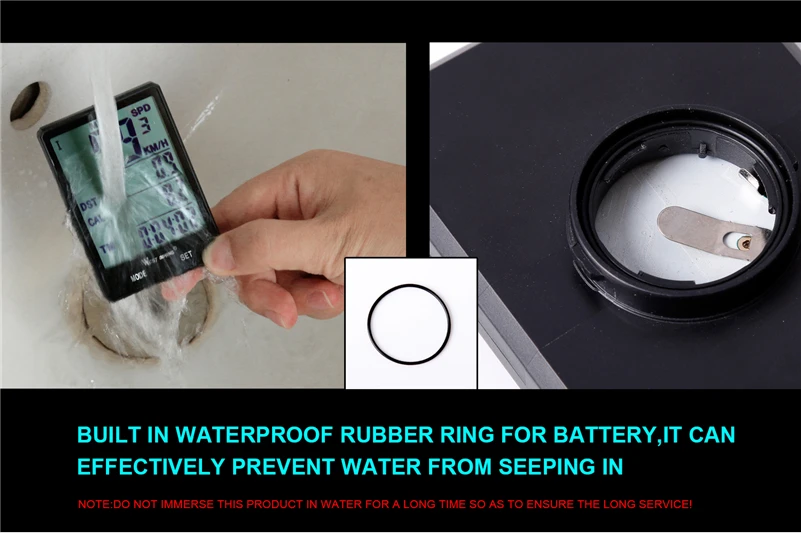
Remove the battery cover and put a piece of CR2032 battery into the case. Notice: Positive pole (+) should be set upwards. Then cover the the battery cover and screw down.
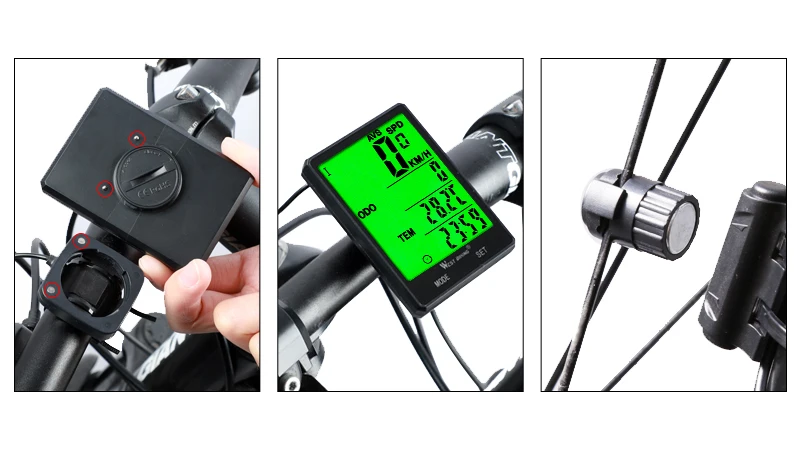
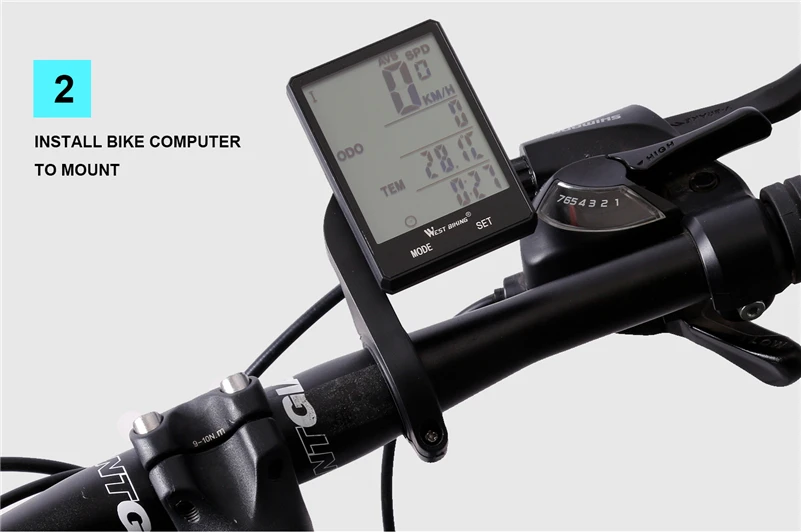
Pedestal Installation
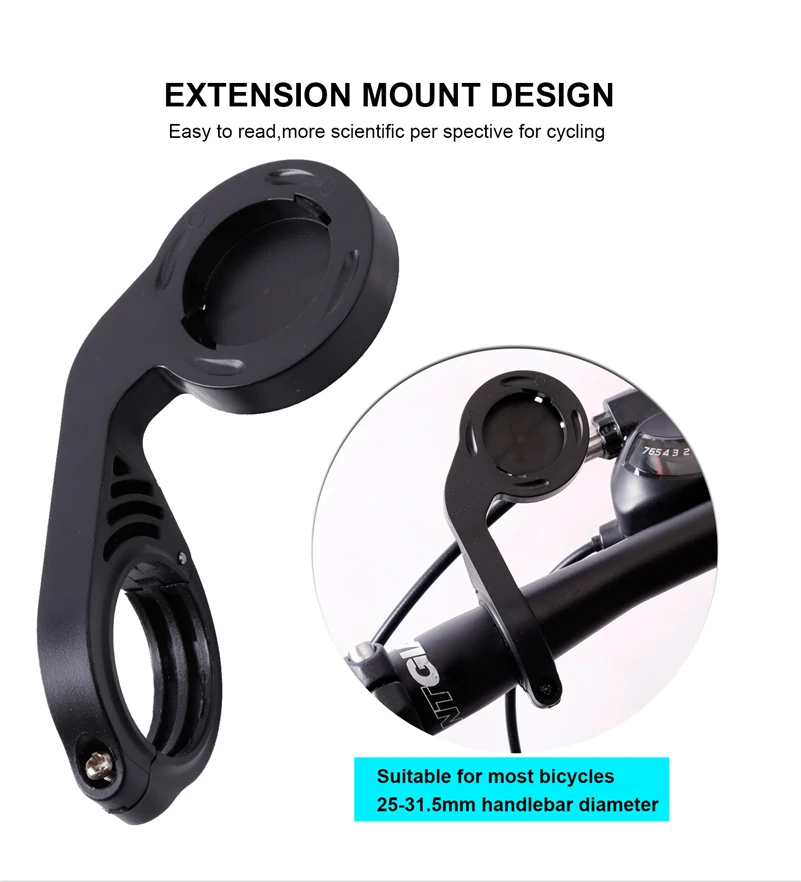
In the accessories pack there has a strap which can be used to fasten the Seat onto the handlebar, as well we can use the back-up plate to fasten it.
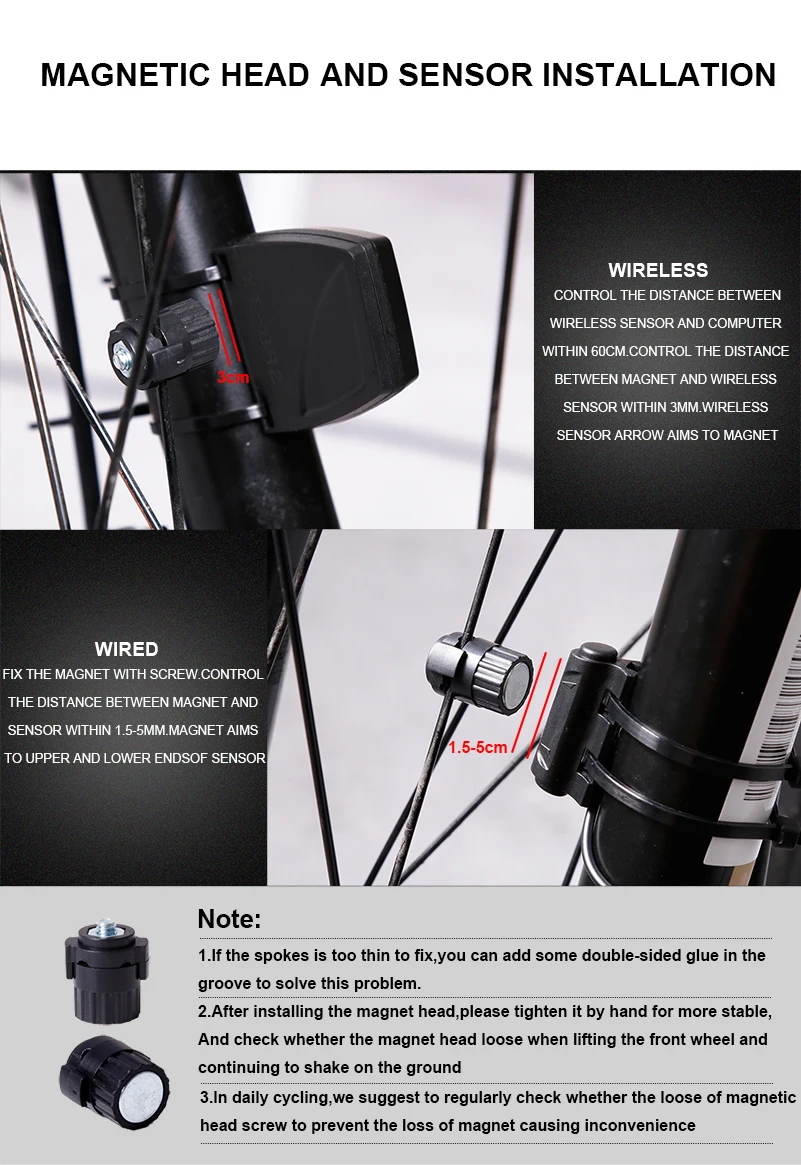
Sensor and MagnetInstallation
Install the sensor onto the front fork of bicycle, and the magnet is installed onto the steel wire at the same side of wheel. Sensor can be underlaid with back-up plate and use the strap to fasten onto the front fork.
It needs to be installed in 60cm distance from the computer, as the picture shows. Adjust the comparative location of Sensor and Magnet. The plane must face to the inductor. Keep the space to be 1.5mm.
Magnet cannot be set to the center of Sensor face-to-face, it's better with the head or tail of Sensor

Wheel Perimeter Setting
Input the circumference from 0 mm to 999 mm. You can alsomeasure it by yourself by the following ways: First make amark on the ground when the nozzle is on the below.
Then make the wheels run once the gas mozzle on the below againplease mark. And measure the distance between the two marks you can get your wheel perimeter.
If the distance is 1615 thenyou should input 1615. (You can also measure the diameter and multiply 3.14 to get the perimeter.)

Setting Steps
1 Put the battery on – Setting KM, M, press SET button to choose and press MODE button to confirm. 1 mile = 1.609 km.
2 Wheel I perimeter setting, the screen shows 2060 (perimeter is 2060 mm). Setting the flashing number from right to left, press SET button to change the number and press MODE button to confirm.
3 Wheel II perimeter setting, the screen shows 1860 ( perimeter is 1860 mm). Setting the flashing number from right to left, press SET button to change the number and press MODE button to confirm.
4 Weight setting. Screen shows K065 and ldquoKrdquo flashing.First
choose Kilogram K or Pound L then setting the value. Press
SET button to choose and press MODE button to confirm.
5 Bicycle I Maintenance setting, screen shows 0200, setting from right to left. Press SET button to change the flashing number and press MODE button to confirm.
6 Bicycle II Maintenance setting, screen shows 0800, setting from right to left. Press SET button to change the flashing number and press MODE button to confirm.
From now on you have finished the setting, and you can
ride your bike. Default bike is bikeI.If you want to reset
please press left and right key for 6 seconds at the same
time, and the steps are the same with above.
ODO, CLOCK and TEM unit Setting
Under ODO – TEM – CLOCK mode, press SET button ODO flashing, press SET button again TEM flashing, press SET button again Clock icon flashing. When ODO flashing, press SET button for 3 seconds to set ODO value. Press the SET button change the number, press MODE button to confirm it, set from right to left number.
When TEM flashing, press SET button for 3 seconds to set the temperature unit. Press SET button to change deg/deg, press the MODE button to confirm it. When Clock icon flashing, press SET button for 3 seconds to set the date. Press the SET button to change time number, press MODE button to confirm it. Then press SET button to change 12H /24H, press MODE button to confirm it. Press SET button to change time number, press MODE button to confirm it.
DST,AVS, MXS, TM, CAL and FAT clear to zero
Under DST – CAL – TM or DST – FAT – SW mode, press SET button for 5 seconds to clear DST, AVS, MXS, TM, CAL and FAT value to zero.
Backlight
During 17 :00-07 :00, screen will be lighted up for 4 seconds
when you press any key. But if you want the screen always
lighting at any time, press both SET and MODE button for 1
seconds to keep the screen always lighting up. Press SET and
MODE button for 1 seconds again to cancel it .
Stop watch
Under DST – FAT – SW mode, press SET
button to shart Stop watch press again to paus,
then press MODE button to clear tozero.
It ranges from 0:00:00 to 9:59:59.
Auto off
After 300 seconds no signal inputs the computer, the screen will turn into OFF state with only clock and date display. It will be restart when you press any button.
Maintenance Alert
Under ODO – TEM – CLOCK mode,when distance value reaches to the maintenance setting value, the spanner icon will be flashing in the screen,press the SET button for 3 seconds to cancel it.
Current speed
Screen will show current speed only when you are riding. Precision is 0.1KM/h. Range at 0~99.9 KM/h (M/h).Screen shows MXS or AVS when you are not riding
Speed tendency
Screen will show a tendency when you are riding. Speed up, it goes high. Speed down, it goes short.
Low power indicator
Once the battery voltage decreases to 2.5 V, the blank battery icon will be flashing on screen, that reminds you to change a new battery.
Two Bicycle I / II using
Under any mode press MODE button for 6 seconds to change to another bicycle mode.
Resetting
Press both MODE and left Buttonfor 6 seconds to reset KM /
M, wheel perimeter/ weight / maintenance.
Memory function
All cycling and setting data will be kept after changinng a battery.
Because of this, the computer haven't cleared to zero before sending to you.


Shippment:(China Post, Singpore Post, EMS, DHL, UPS, FedEx, TNT)
10-20 Working Days | Japan, Singapore, Korea, Malaysia, Thailand, Indonesia
12-25 Working Days | United States, Canada, United Kingdom, Germany, France, Italy, Israel, Austria, Australia, Ireland, Bulgaria, Poland
12-26 Working Days | Norway, Portugal, Sweden, Switzerland, Slovakia, Greece, Hungary, Belgium, Denmark, Finland, Croatia, Spain
13-27 Working Days | Turkey, New Zealand, Russian, Ukraine, Belarus, Philippines, Romania, Lithuania
20-45 Working Days | Brazil
Size or Fit Issues
The sizes are illustrated with specific measurements in the detailed specifications. Please check the specifications before you place an order. If you find the size of the products do not fit you, you can directly contact us.
Color Mismatch
Differences in color may be caused by some other reasons such as color reflection in the monitor, lighting, background etc. However, if you believe that the item received is in wrong color, please contact us to see if a return or refund is possible.